Symtoms of excessive valve clearance:
- Tapping, rattling sound coming from top of engine.
- Poor performance
Symtoms of too tight valve clearance:
- Poor compression, especially when engine is hot.
- Rough idle.
- Poor fuel economy.
- Burn/damaged valve/valve seat.
General notes:
- As the cam lobes and slipper faces wear the valve
clearance will increase.
- As the valves and the valve seats wear the valve
clearance will decrease.
- The valves are closed ¾ of the time and while closed
are cooled by contact with the valve seat, the exhaust valve
relies heavily on valve seat contact for cooling, thus if the
valve does not close fully the valve will over heat and burn. - Valve clearance should be near zero when the engine is at
normal operating temperture, when the engine cools the valves
will shrink due to thermal contraction thus causing a clearance
to open up. The longer the valve stem the more clearance it
will require. Exhaust valves get hotter than inlet valves so
usually require more clearance. - Valve clearance should be inspected on a cold engine.
- Valve clearance should be measured when the piston is at
"Top Dead Center" on the compression stroke, turn crankshaft
another 90° after the inlet valves close to reach this
position, use the notch on the flywheel to find exact position.
Specific notes:
- Honda reccomend inspecting the valve clearances
every 12,000 Km. - Removing the rear rocker cover is easy, however,
removing the the front rocker cover is difficult. - You can tell the difference between the inlet
and exhaust valves by the fact that there are two
small inlet valves and one large exhaust valve.
Procedure
- Ensure engine is cold.
- Remove fuel tank and air box.
- Disconnect all spark plug caps.
- Rear cylinder.
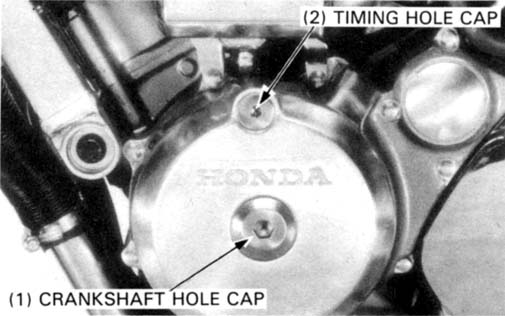
- Remove the timing hole cap and the crankshaft
hole cap on the left side of the engine. Both
caps require allen/hex keys to remove them. - Remove rear rocker cover.
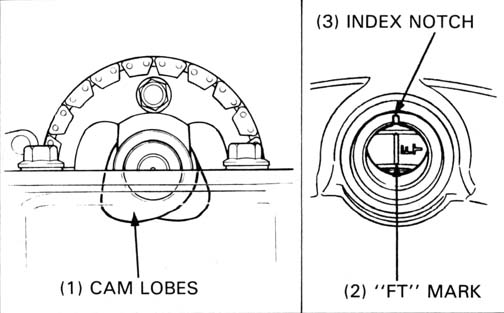
- Rotate the crank shaft counter clockwise while
looking inside the timing hole until the "RT" mark
aligns with the index notch on the crankcase cover,
and make sure all the cam lobes are facing down and
the piston is at Top Dead Center (TDC) on the compression
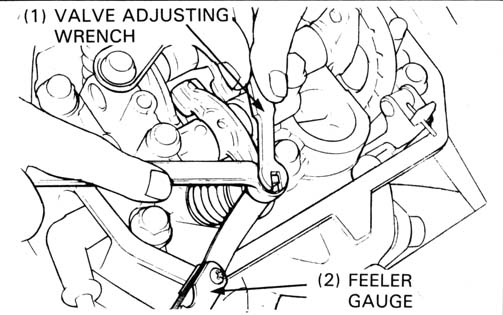
stroke. - Inspect the valve clearances by inserting the
appropriate blade of a feeler gauge between the
contact points, if the clearance is correct you
should feel a slight drag when you pull on the
feeler gauge. - If the valves require adjusting then hold the
square head of the stud with a special valve tool
or with a pliers and loosen the lock nut with a
tight fitting 10mm ring spanner. Adjust the
clearance and re-inspect.
- Remove the timing hole cap and the crankshaft
- Front cylinder.
- Remove radiator mounting bolts, but do not
disasemble the cooling system.. - Remove thermostat housing mounting bolt.
- Remove the rocker cover by pulling it out
the space left by the dropped radiator. Be
carefull not to damage gasket surfaces. - Rotate crank shaft counter clockwise until
the "FT" mark aligns wiht the index notch on
the right crankcase cover, and make sure all
the cam lobes are facing down and the piston is
at Top Dead Center (TDC) on the compression stroke. - Repeat steps taken on rear cylinder.
- Securely glueing the gasket into the rocker cover
will making re-installation of the rocker cover easier.
- Remove radiator mounting bolts, but do not